Why is it that something that looks so simple and easy can turn out to be the hardest part to draw? Have you noticed that about leaves? I definitely did. I often found myself so focused on drawing the flowers accurately that barely paid any attention to the leaves and just fell into a habit of drawing some uniformed and generalized leaves that all looked the same and thought I could get away with that. It works when you are just starting out, but when you are moving on to more realistic and more sophisticated drawings, you realize that leaves can easily turn out to be the hardest part of the drawing or painting. They either look all perfectly the same and that just looks odd, or they don’t look like they belong to that plant or flower, or they simply look so plastic that it’s hard to tell if it’s a leaf or not. And that is why I am creating this guide for you, with only 4 surprisingly easy steps, but I can assure you that the result will speak for itself.
4 steps to drawing realistic leaves
- Embrace perfect imperfections.
- Explore variety. Not all leaves created equal.
- Add texture.
- Show Perspective. Add different angles.

1. PERFECTLY IMPERFECT.
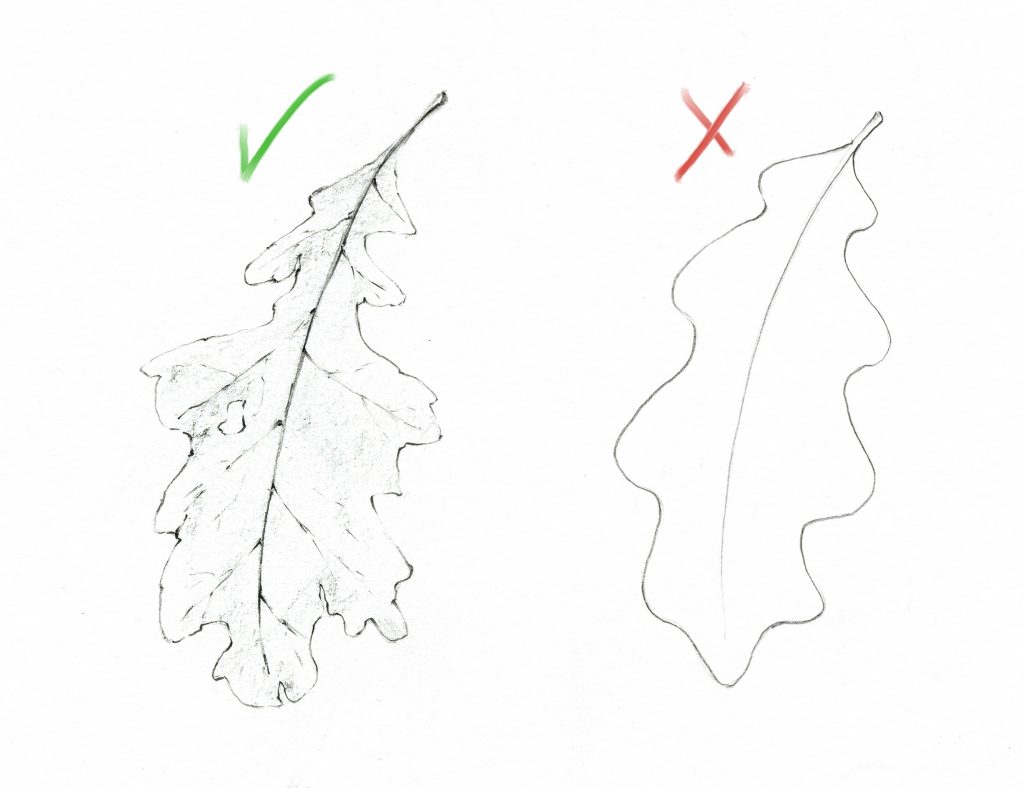
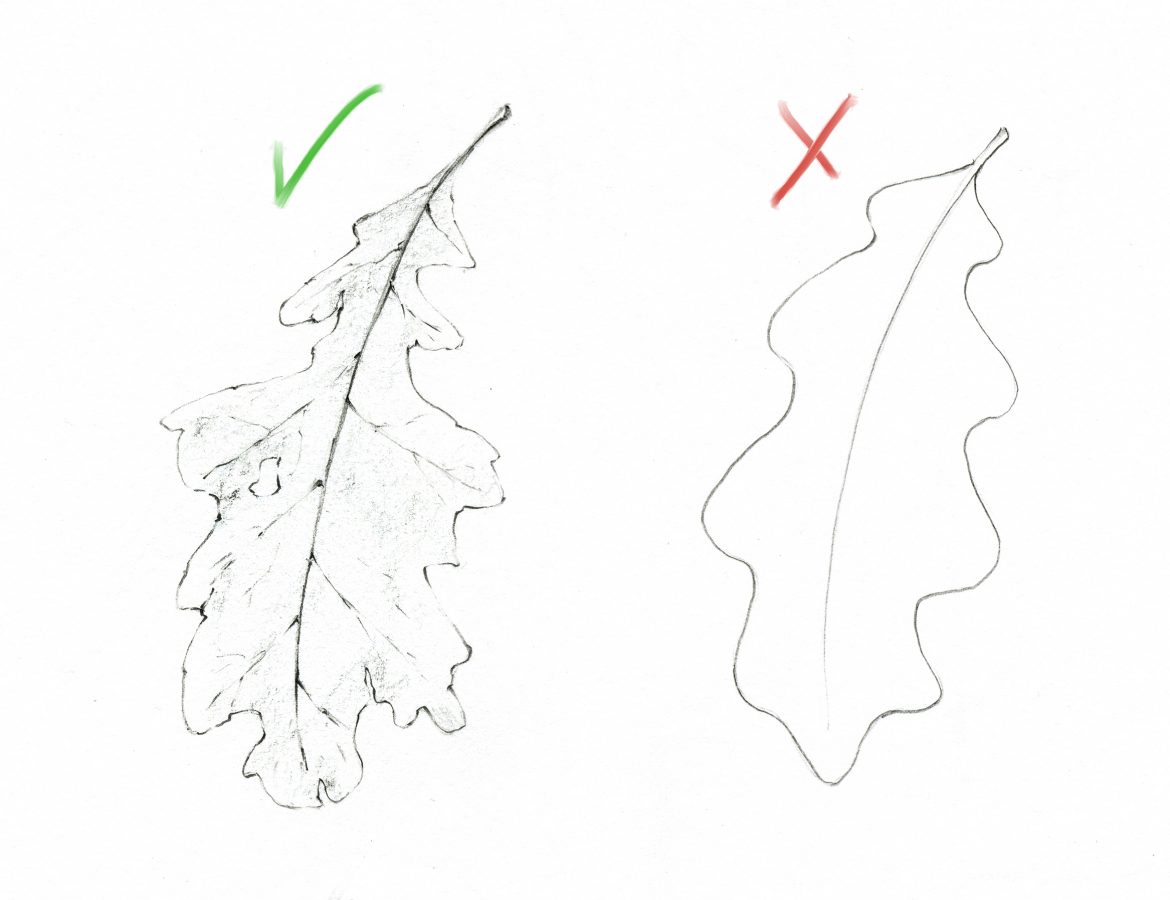
The purpose behind creating realism is not in creating perfection. Nature is of course often associated with perfection, but human understanding of perfection is a little different. We see it in symmetry, smoothness, shininess, and overall having a polished look. However, nature fearlessly embraces the raw, untamed and a little weathered look.
And what I’m trying to say here is that in your attempt to create a realistic, or natural I should say, look, you should not strive for perfection and rather really observe what your leaf, a flower or a tree looks like. Every object in nature has its own unique look, something that sets it apart. Even walking into a forest, you won’t find two identical pine trees, or two perfectly identical leaves on any given tree or a plant. They have dents, cut, missing parts, longer or shorter stems, etc.


What I‘m trying to say here is that you can’t assume by looking at one leaf, that now you can draw all the leaves of that plant. You must always observe and pick out the differences between them and translate them into your drawings. Only that way, by careful observation, you will begin creating more realistic leaves that don’t look like perfect clones, but rather tell a story of that plant and create a unique portrait that represents that plant best and sets it aside from other plants of that species.
2. EXPLORE VARIETY.
Majority of us can tell the difference between a rose flower leaf and a clover leaf without having to google it, but what about some less common plants? The key to creating a realistic leaf lays primarily in identifying the right leaf of the particular plant. That is why I always preach drawing and painting from reference. Now you don’t even have to go outside to find it.

Research the plant that you are about to draw and study the leaves very closely. What makes them different from other plants? What are some possible variations within that particular species? You will be surprised by how many variations of one leaf you can create by observing how some look smaller or bigger, how they are arranged, how they differ depending on what part of the plant they grow (the ones on the bottom are usually bigger and more weathered, and the ones on top are usually smaller and much cleaner).
When observing the leaf, you need to pay attention to two main characteristics: STRUCTURE (simple or compound) and ARRANGEMENT (alternate or opposite)

Let’s look at STRUCTURE first. It can be simple or compound.

Simple leaves consist of one main leaf that is attached directly to the stem of the plant, like ivy or eucalyptus leaves.

Compound leaves usually consist of a few leaflets that are grouped together, like clover or rose. Compound leaves might look more complicated at first, but there’s usually a recognizable patter with, for example, a single leaf at the top and two or more paired leaflets at the bottom. However, the leaflets are not always of the same size and this characteristic will be different for each plant!
ARRANGEMENT of leaves also plays a significant role, and it can be alternate or opposite.
In alternate arrangement leaves are growing one by one, usually on the opposite sides of the stem. The most popular example is Ivy plant.

In opposite arrangement, the leaves are attached to the stem in pairs. However, each pair might grow at a different angle to the pair below and above to get better sun exposure. Eucalyptus is a perfect example.

3. ADD TEXTURE.
Texture definitely plays one of the most important roles in creating a realistic drawing. While a simple outline could provide a sufficient description of a leaf, something as simple a few veins can already enhance the look.

In addition, veins are providing a better description of the plant that the leaf belongs to. Leaf veins usually come in two forms: Parallel (like lilies or tulips) and Reticulate (Ivy or maple leaf).
Parallel veins run from the base of the leaf to the tip parallel to each other. These veins are usually all the same thickness with a little bit of variation.

Reticulate veins create a web-like pattern that originates from the main vein that often runs as an extension on the leaf stem. The farther away the veins are from the base of the leaf, the smaller and thinner they get.
Another important step in adding texture is observing the outer edge of the leaf. Some leaves have a smooth edge like tulips, and some have a rough edge like roses, but don’t let these two kinds fool you because there is plenty of texture variation in between, you just have to always pay attention.
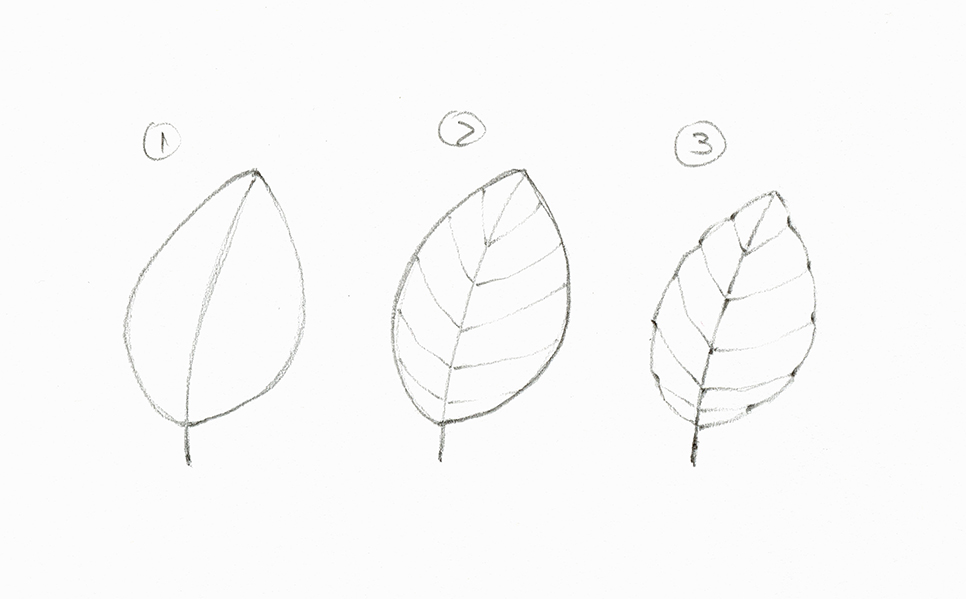
To create a simple texture you can try these three steps:
1.Draw the shape of the leaf
2.Draw the veins
3.Refine the outer edge of the leaf by drawing small dents where the veins reach the outer edge. Erase the initial outline.

A lot of these details will also depend on your personal style. I prefer when drawing a rose leaf, for example, to avoid harsh spikes on the edges and soften them up a little bit. Try different ways and experiment for yourself, but always begin by learning from observation.
Lastly, don’t forget the small imperfections like cuts, holes and dents. They all help you create a more interesting drawing with a better sense of realism. And to further perfect this technique, try experimenting with lost and found edges.

Lost edges are the tiny lines that are almost disappearing and found edges are the thicker lines that draw attention to themselves. This creates a more artistic look and adds a flow to your drawing because it gives your eye a cue to follow along and observe the piece a little longer. You can find me using this technique in almost every drawing and the easiest way to do it is by varying the pressure on your pencil.
4. PERSPECTIVE.
Perspective is a core feature of any realistic drawing, not only of a plant. But don’t let this fancy word overwhelm you, adding a sense of three-dimensional space is easier than you think.

First of all, you need to explore different angles of the leaf. Look at it from different sides and observe how foreshortening changes the shape from each angle. The key in creating a successful foreshortened image of any object is drawing what you actually see. This means that in a lot of different angles you won’t see the front or the back of the leaf, and when you look straight at it, it will also appear smaller.
When experimenting with different angles, you will need to practice drawing overlapping and bending leaves and I have a few simple steps to help you.
First of all, begin with a center line of a leaf and draw an expressive line that represents the angle and a trajectory that the rest of the leaf will follow.
Then, mark the sides of the leaf with dots and, originating from the base of the leaf, draw two matching lines though the side dots and connecting to the tip of the leaf. Some lines will turn out to be covered by an overlap so just erase what you can’t see and leave what you actually see.

Remember that no matter how your leaf is bending, the center line and the edges will always follow a continuous line. Even when the visible line disappears behind the curve, you must be able to visually extend that line to where it smoothly connects to the visible part of it.

Practice by drawing the inner and outer lines in a different color to train your eye to better see the perspective.

Try the same technique for a leaf facing you and away from you. With practice, it will eventually become an intuitive step where you will be able to draw foreshortened leaves freehand without helping lines.

To add more definition to your bent leaves, add a sense of light by shading the areas that are hidden from the light source.

I hope you found this tutorial helpful and are practicing drawing your leaves with these tips in mind. I always follow these steps in one way or another when creating my illustrations because they are the core elements of any realistic drawing.
To give you some information on improving your botanical drawings, I will highly recommend checking out these two books:
Let me know if you have any further question and share your leaves. I would love to see them! And if you liked this tutorial, please consider becoming a supporter by making a small one-time donation that would help me keeping this free blog running! I will be forever grateful!!!
 Buy me a coffee


